The main goal of the educational cycle, called Lead Nurturing is to prepare potential customers to make a purchase. Not every person who appears on the website is ready to immediately put their data on the table and finalize a transaction. Very often, people visit your digital realm while researching the best solutions. A series of messages that, step by step, bring this person closer to the product, service, and your company can do wonders and significantly shorten the length of the purchase process. Well prepared Lead Nurturing messages are quite willingly opened and clicked by the audience – our clients speak about the average Open Rate around 35%, and the average Click Through Rate around 21%. How to design and implement an educational cycle that will accelerate customer purchasing decisions and help you build long and fruitful relationships with them?

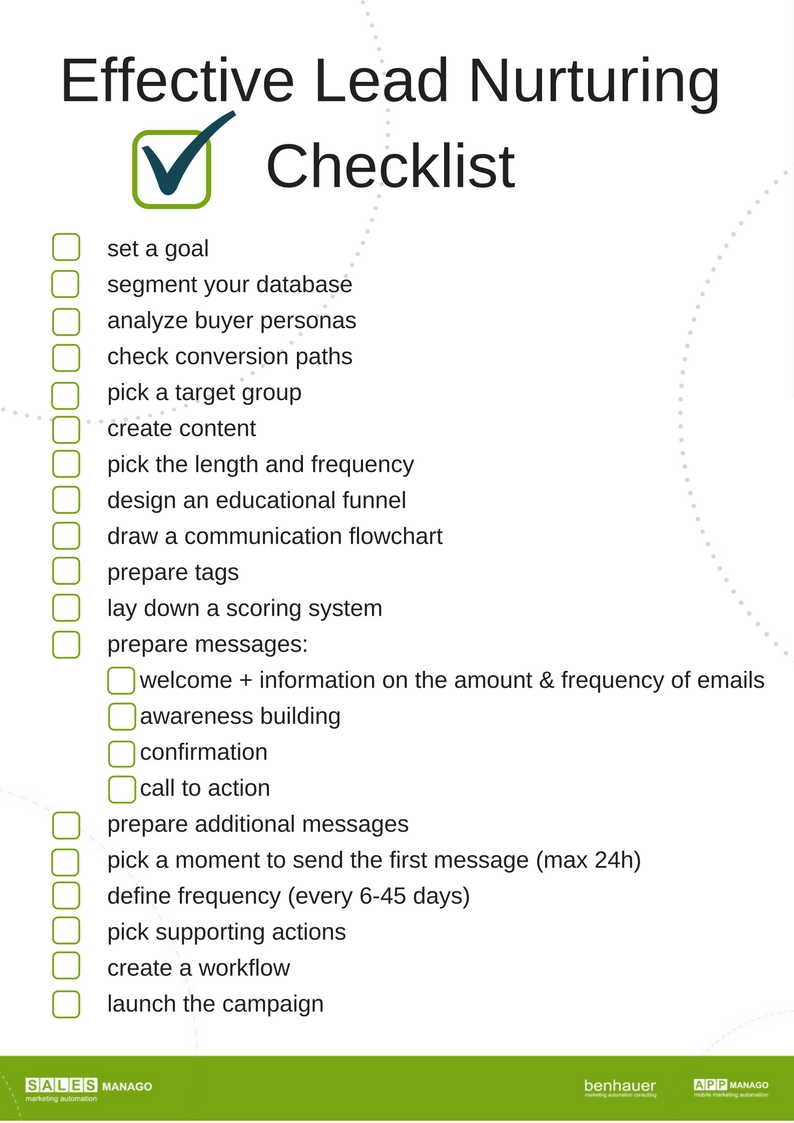
Preparing a cycle that will be effective requires a rather methodical approach. It’s not enough to write a few messages and set them up as an autoresponder. Functional Lead Nurturing require the definition of purpose, plan preparation, support of marketing automation and measuring the results. To facilitate your work, in consultation with our support department, I have prepared a detailed checklist for each stage of the education cycle preparation. Below you will find a list with the comments and the checklist to download.
- Set a goal – in the beginning, you have to decide why you are creating the cycle. Consider whether it is to shorten the sales process and facilitate the work of salespeople (B2B), increase the number of transactions for exclusive products (Ecommerce), help users get through the onboarding process, or to become an after-sales service for the newly purchased product?
- Segment your database – tidy up your contacts and select the audiences you want to direct your cycle to. Use the RFM analysis that examines customer transactional behavior. You can also filter the audience regarding their industry, occupation or demographic data.
- Analyze buyer personas – creating a buyer persona (a typical customer image crated with the behavioral data from compay’s CRM; usually, companies create more than one persona) facilitates the process of designing the education cycle. A typical customer profile allows you to find the information and benefits most likely to interest prospective buyers. Such action will affect the open rate of the message and the engagement of its readers.
- Check conversion paths – track the road from random Internet user to your client, so you can adjust the order of content presentation and sent incentives.
- Pick target group – you already know what you want to achieve and who you can direct your message to. Take the next step and define who you want to target this particular education cycle.
- Create content (blog, website, internet) for messages – instead of creating long emails (not recommended) redirect your readers to relevant places on your blog, website, download center, or network. Select educational content to build the story you want to tell.
- Select the duration of the cycle and the number of messages – how many messages do you want to break your cycle into? 4, 7, or maybe 12? And how often do you want them to be sent? It is a good practice to spread the Lead Nurturing for a period of time, equal to the one when the new contacts start to consider the purchase (that’s why you need to analyze the conversion path). According to research, the frequency of messages should be somewhere between 6 and 45 days. It is important not to spam people every day.
- Design an educational funnel – design how your educational cycle should work. Name specific stages, for example: product knowledge, company knowledge, demo. Determine what conditions must be met for the contact to move on to the next stage. This will help you keep track of the effectiveness of your campaign and efficiently pass the educated leads to salespeople.
- Draw a communication flowchart – draw a “conversation” with the user in the form of the simplest algorithm. At this point, start wondering how will you respond if a contact ignores the message and how if they click on all the links contained in it.
- Prepare tags – this step is not mandatory, but it makes it much easier to manage your contacts later. Consider what elements are key throughout the cycle (download ebook, go to product page, open all messages, go to next stage of the educational funnel, try demo version) and prepare the tags that match them accordingly.
- Lay down a scoring system – just like tags, points awarded for specific actions help you manage your contacts and processes.
- Prepare messages – use the drag & drop wizard and ready-made templates, or create your own message from scratch. Mind to make it viewable on all types of devices – laptops, smartphones and tablets!
- Welcome and information on the amount and frequency of messages – it’s polite to present oneself and greet the person you are writing to. Tell the recipient who you are, why you write to him, and how long the cycle will take. They will know what to expect and why they should read your messages.
- Awareness building – in the first messages, tell the user about the idea of the product, the materials used and care you have for the creation process, send some research and inspire on how to use it.
- Confirmation of the right choice – here you can start to praise yourself a bit: write about yourself, inform about the awards won, show customer feedback. In short, ensure the recipients on how well they choose.
- Call to action – in the end, you have to tell the audience clearly what you expect from them. Send an invitation for a webinar, demo link, and add any other clear call to action.
- Prepare additional messages – communication can move to different channels, such as web push or sms, as long as they fit the overall concept. If you think this will be beneficial, then prepare additional messages that fit into the educational cycle. This category also includes sales and marketing alerts for leads that are ready to be contacted.
- Pick a moment to send the first message (max 24h) – it is best to send it when users still remember your logo and know what dragged them to your page. The best moment is within 24 hours after an event that triggers a cycle.
- Define frequency – as I already mentioned, first determine the length of the cycle and then divide that time by the number of planned messages.
- Pick supporting actions for people who haven’t open the message – sometimes despite your efforts, the recipient ignores the message, or stops responding to what you are sending. First of all, it is clear to you that the cycle requires tuning. Second, be prepared in advance for such an eventuality. The marketing automation platform offers a number of communication channels, such as sms or web push, with which you can contact the user and let him or her know about the email waiting in the inbox.
- Connect the messages to create the education workflow – it’s best to use the Workflow Wizard for this purpose. You can easily move to the algorithm you’ve drawn and set all the relations between the messages that you send.
- Launch the campaign – icing on the cake: run the campaign!
But before you lay back and relax, keep in mind that your campaign needs to be monitored and optimized on a regular basis. Fortunately, the marketing automation platform is equipped with accurate analytical panels, which makes this task much easier.
Your Checklist:
 Follow

