We have recently enabled the integration of SALESmanago with the popular open source ecommerce platform – Magento 2. By integrating Magento 2, SALESmanago users can enlarge their contact database with additional data from contact forms placed and filled in on their online store website.

Changes in Magento 2 (compared to earliest versions)
Magento 2, the latest version of the open source online store software augments the last version’s efficiency and compatibility. Magento 2 officially supports latest PHP versions (from PHP 5.5. to PHP 7.), uses Varnish caching and JavaScript pack optimization. It also contains built-in tools designed for image compression which enables making changes directly on the server. It has also been improved process of browser caching for static content.
In addition, admin panel and navigation interface have been modernized. Website built on the platform is responsive and able to scale current content which adapts to the device on which it’s displayed. The product creation workflow has been enhanced and there are more options of its configuration. Summaries of shopping carts are clearer and the buying process more efficient and adapted to new various payment methods.
Migrating data from Magento 1 to Magento 2
There is a possibility to migrate data from Magento 1.x to Magento 2.0. Unfortunately, there’s no way to move all the data – particularly it is impossible to transfer custom themes and custom-developed extensions. You don’t have to make changes now, the older version will be officially supported until the end of 2018. Magento 2.0 is still a relatively new and not entirely stable service. To eliminate this problem, it is necessary to make some further optimization. The downside is also that it is difficult to find all plug-ins for this version and solving the problems with the help of internet may be problematic.
Scope of integration
- Automatic adding of monitoring code to contacts;
- Integration of signup and login forms. Synchronization of contacts after they sign up, log in, purchase, newsletter signup, change in their details or subscription settings;
- Integration of external events (CART, PURCHASE) both for contacts that are logged in and those that are not (as long as they have a tracking cookie) as well as WISHLIST (as an “Other” event type);
- Sharing all details (name, email address, phone number, street address, company name, contact status, birthday date, creation date) with SALESmanago;
- Automatic assignment of relevant tags during each registration, purchase and newsletter signup;
- The plugin has been translated into four languages: Polish, English, Spanish and Russian.
INSTALLATION
IMPORTANT: This is the first version of the Magento 2 integration plugin for SALESmanago. It was tested with success on builds 2.1.2 / 2.1.4. Still, because of several errors Magento 2 had during creating of this plugin, we recommend that you carry out the integration under the guidance of an experienced IT specialist. Moreover, while the integration works correctly on a clean platform, it is difficult to predict how it will behave on a developed one. We advise to make sure that you have a backup of all stored data before you conduct this integration.
Step 1
Open the “SalesmanagoMagento2-v1.0.0.zip” archive and copy its contents into <magento-rootfolder>/app/code directory.
If you don’t have the code folder, create it now.
Then, open the file config.php, and add the following line at the end of the table:
‘Salesmanago_Integration’ => 1,
Next, in the menu Stores/Configuration a new tab ‘Salesmanago’ will appear.
Step 2
Connect to your Magento server via SSH. Go to Magento’s root folder and run the following commands:
php bin/magento setup:upgrade;
php bin/magento setup:static-content:deploy;
sudo chmod -R 777 var pub/static;
IMPORTANT:
setup:upgrade deletes the compiled code and the cache in order to update the Magento software. (learn more here)
setup:static-content:deploy – static file view deployment tool (learn more here)
chmod -R 777 var pub/static – changes permissions of var and pub/static directories. Without it, there will be no access to the static content of the page.
Step 3.
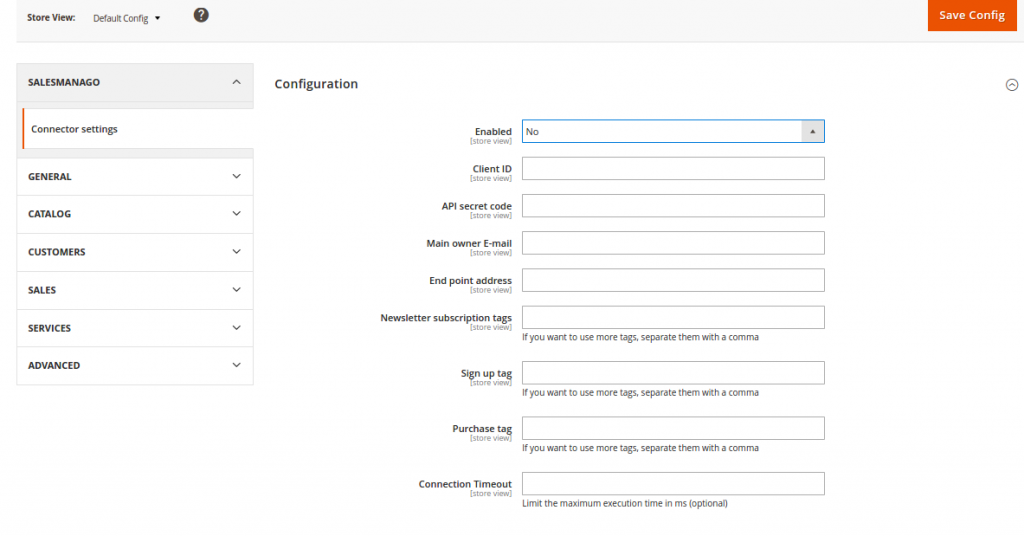
Go to Magento Admin Panel > Stores > Configuration > SALESmanago > Connector settings
This option should become available after Step 2 is made. If it doesn’t, clean cache in Cache Management.
Fill in the form with data from the SALESmanago integration menu.
And that’s it!

 Follow


