 Using SALESmanago Marketing Automation software you can personalize your communication with customers by sending product recommendations adapted to their interest and behaviour, for example in a dynamic email, in our Automatic Sales Chat or in a dynamic recommendation frame on your website. To make use of those advanced features you should add a source of information about the products in your online shop to the Marketing Automation system. With the brand new section, Your e-shops, adding a product data from your website to the SALESmanago platform is now fast, easy and moreover remarkably convenient for those who manage more than one online store.
All that you need is a product feed that contains all the necessary information about your merchandise, for example its name, description, category, brand, price, and many more. The product information can be imported to SALESmanago Marketing Automation system as a XML file. We have great news: the process of adding product feeds to the system is now optimized thanks to the new Your e-shops tab. You can access it by simply going to the Settings section, then the Other tab, and finally choosing Your e-shops from the menu on the left.
What are the benefits of adding information from your e-shop?
The data loaded from your online shop product feed allows you to use advanced SALESmanago features that personalize your communication with the customers, such as:
- dynamic email, a highly personalized message perfectly suited to the customer’s interests, preferences, browsing or transaction history, etc.;
- dynamic website content – you can implement a recommendation frame on your website that will show products recommended for specific customers, for example visited items or similar to the purchased ones;
- email with products from abandoned carts – rescue carts abandoned by your online store visitors and boost your revenue by decreasing the number of unfinished transactions;
- Automatic Sales Chat – synchronize our chatbot with your company’s Messenger and automatically display recommended products to the customers during conversations.
The new section in SALESmanago system is also extremely useful when you manage more than one online store. You can add several product feeds for each shop and choose the adequate one when sending a dynamic email, for example. This way you can plan the entirety of marketing activities for each store from only one platform without even having to switch accounts.
How to easily add product feed to the system?
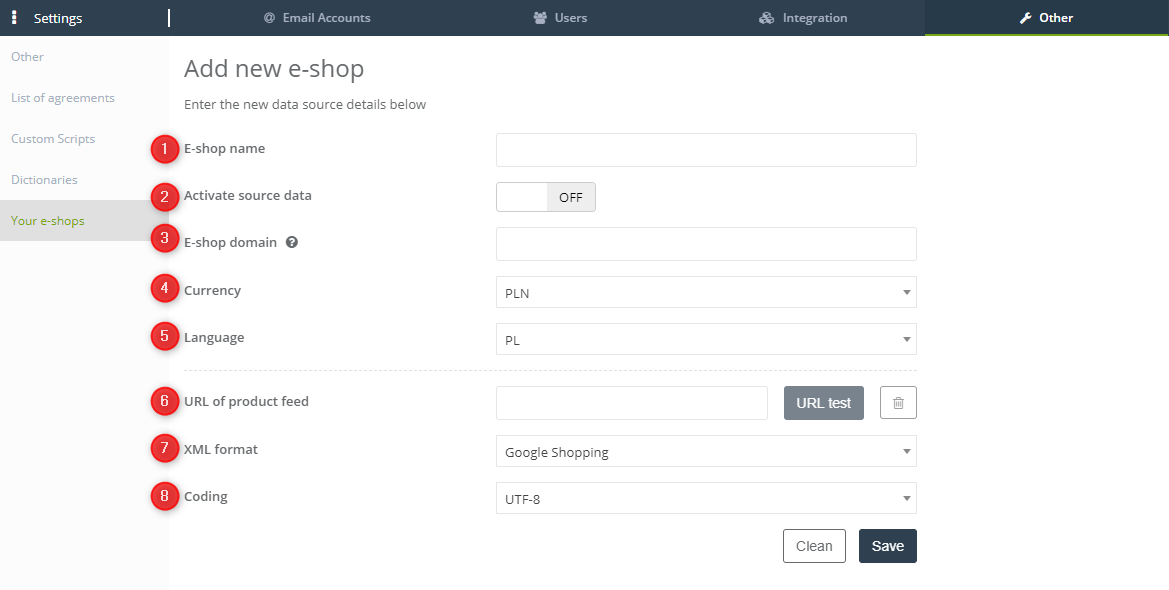
Prepare your XML file following our guidelines and then upload it to SALESmanago Marketing Automation system in the Your e-shops section. Log into your account and go to Settings -> Other -> Your e-shops. Click the button Add new e-shop. Fill all the necessary information such as e-shop name, domain, currency, language etc. You have to also provide the product feed URL. Remember that with each e-shop you can add one XML file and it needs to be prepared according to our requirements.
[1] – Search for the e-shop by typing here its name.
[2] Default transform – when you add a new e-shop, you can choose the XML format. When you choose a Default option from the dropdown list, you will need to paste the XML transform in this place. If the XML format of the added e-shops is marked as default, then it means that every added e-shop will be of this format.
[3] Add new e-shop – the option of adding a new e-shop. Within one e-shop you add one XML file.
[4] Status – your e-shop can be either active or inactive.
[5] Activation / deactivation – click this button to activate or deactivate the e-shop.
[6] Edit – the option of editing the e-shop.
[7] Delete – deletion of the e-shop.
REMEMBER: You can choose to activate, deactivate, edit or delete the e-shop at any time.
After adding XML to the system, you can add your e-store.
[1] E-shop name – type in the name of your e-shop. Under this name, you can find the e-shop in the system.
[2] Activate source data – this is the button of activation and deactivation of the source data.
[3] Shop domain – determine the shop domain from which XML files will be used in the transform (e.g. domain.com or www.domain.com).
[4] Currency – specify currency format of the data source.
[5] Language – specify the language of the data source.
[6] URL of product feed – URL of the XML file. You can add more XML files to the shop but they need to have the same transform. To include more URLs in one shop you need to contact [email protected].
[7] Choose a transform – choose a transform from the list. Advanced users can paste their own transform in the field that will display after choosing option Other from the list. By choosing Default, you need to paste the transform after clicking Default transform (illustration 1).
[8] Coding – select type of charset. Options to choose from: UTH-8 or Windows 1250 (accurately, as in XML file).
Click Save to save information concerning the new e-store.


 Follow


