Express Form designer is a new SALESmanago functionality which allows you to easily create contact forms. It is fully responsive and designed for computers, tablets and smartphones. It appears on the website as a frame with contact details to fill in. The form can be placed in a chosen place on the website and easily modified.
ADVANTAGES OF EXPRESS FORM DESIGNER:
Simple to use and fully editable. These are the characteristics of a new Express Form Designer. What are the other reasons you should try this new functionality?
 – it is fully responsive; you don’t have to adjust the parameters in the designer because the code will adjust to the size of the website and it will scale automatically
– you can place it anywhere on the website
– you can choose a type of the form that best fits your needs
-it saves your time; creating a form takes just a few minutes
– a contact form is perfect way of generating leads as well as updating their profiles with the new information.
To start creating a new form go to: Generate leads => Generate leads => Generate leads => Form
Design your form in 5 easy steps:
1. Choose the type of the form.
2.Adjust the settings of the form.
3.Adjust the settings of thank you page after subscription.
4.Adjust the settings for the confirmation email.
5.Final settings.
CHOOSING THE TYPE OF THE FORM
 You can choose between 4 types of forms available:
New visitors contact form – a form dedicated to the new customers.
Newsletter sign-up form – a form designed for a subscription.
Telephone contact form – a form that is designed to acquire a telephone number.
Comprehensive Contact Form – a multipurpose contact form.
SETTINGS OF THE FORM
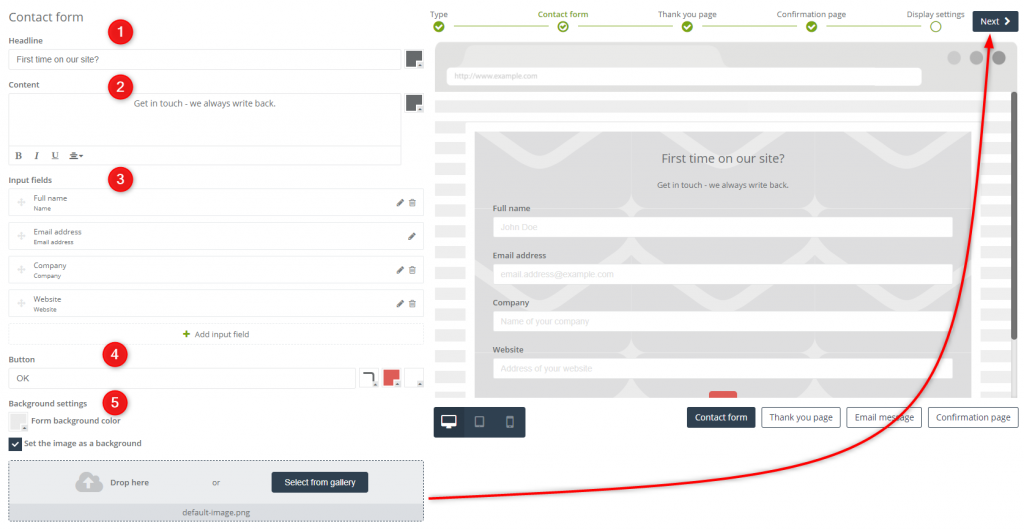
All of the templates are fully editable. You can select your own headline (1), content (2), you can input and edit fields (3), customize the button (4), form background color or use your own picture as a background (5).
THANK YOU PAGE AFTER SUBSCRIPTION
The next stage in creating a form is adjusting the settings of a thank you page. This is a short message in which you can thank for the data that the customer shared with you. Design your own unique message, select an image or add your own (1), create the content of your message (2), pick background color or set the image as the background of your thank you page (3).
CONFIRMATION EMAIL
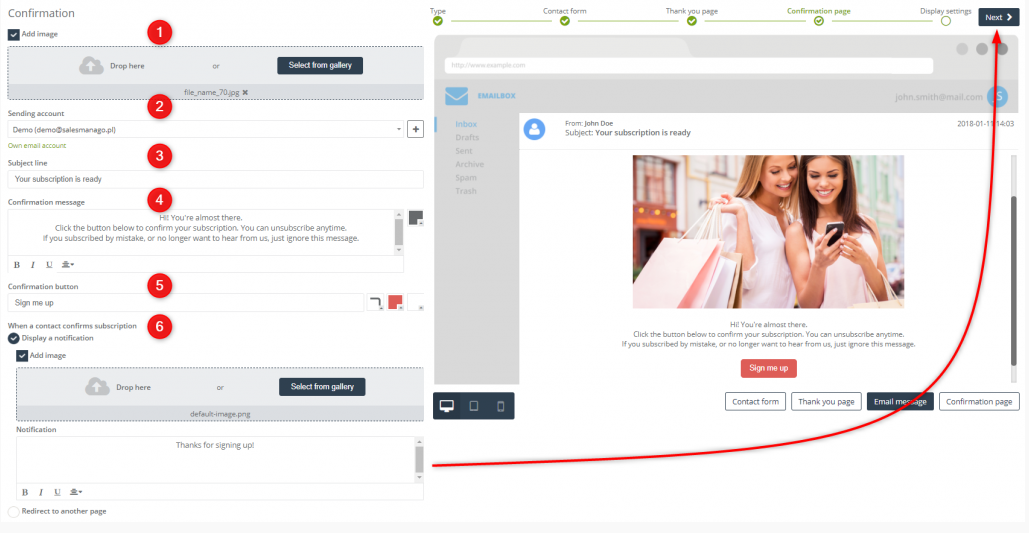
Every user, who signs up for a newsletter, receives a confirmation email. You can add images displayed in the message (1), choose a sending account (2), edit the subject line (3) and content of your confirmation message (4), the text in the confirmation button (5). You can also create a notification after a contact confirms subscription or enter the URL address of the page where the user will be redirected after confirming the subscription (6).
FINAL SETTINGS
In final settings you can adjust:
Form name – the name of the form under which you can find it in the system (1).
Page title – the text that will display on the browser tab when the only thing that displays on the website is the form (2).
A tag after completing the form – the name of the tag that is assigned to a contact after completing the form (3).
A tag after email confirmation – the name of the tag that is assigned to contacts after they confirm the subscription (4).
By clicking FINISH, you save your form and then you receive a pop-up window with a code that you need to paste into your website.
And that’s it!




 Follow

