The new feature of SALESmanago – dynamic email using scenario – is the answer for the constantly growing clients’ expectations. Fully personalized content and products adjusted to the clients’ interests are the characteristics of dynamic emails. Their efficiency in email marketing is indisputable. With the new designer of dynamic emails using scenario you can easily create messages with the information about the products added to cart, recently viewed on the website or with complementary products.
The statistics show that email marketing is still at its peak . In SALESmanago we do not only focus on new technologies, but we also develop those marketing automation tools, that are well-known and widely used. Dynamic email using scenario was created to help the marketers to lead time and money-saving email marketing campaigns. Creating emails with the new designer is simple and quick so anyone can do it by himself without any professional help. Thanks to the data taken from the XML file of your shop, the information is precise and the clients receive the message with products that they really need.
The advantages of using dynamic email using scenario:
– emails with tailor-made content
– increased conversion even for 300% compared to the mass newsletter emails
– increased number of rescued abandoned carts
– increased sales and revenue
How to create a dynamic email using scenario?
Go to:
AUTOMATION PROCESSES -> WIZARDS -> DYNAMIC EMAILS
Main steps:
- Choose an email or create a new one
- Product frame
- Choose the scenario
- Adjust the settings of the mailing
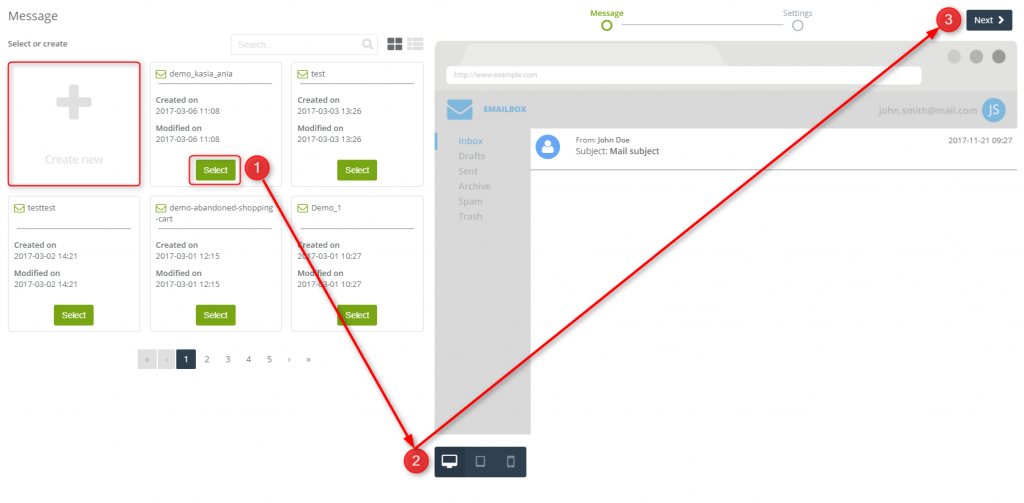
1. Email / Create a new email
The first step is to create a new email or choose the ready one. In the first case, you need to click [+] Create new and you will be redirected to the wizard.
In SALESmanago, you can create emails in our advanced Drag&Drop Email Designer. Thanks to the various widgets available you can create personalized emails within a blink of an eye. The process of designing an email is quick and simple and all you need to do is to drag and drop the chosen elements into it. The unique technology applied in the designer provide maximum effects.
If you have chosen a ready email click Select (1) to have the email displayed in the preview. You can check how the message will look like when displayed on the desktop, tablet or smartphone (2) and click Next (3) to proceed to the settings of the message.
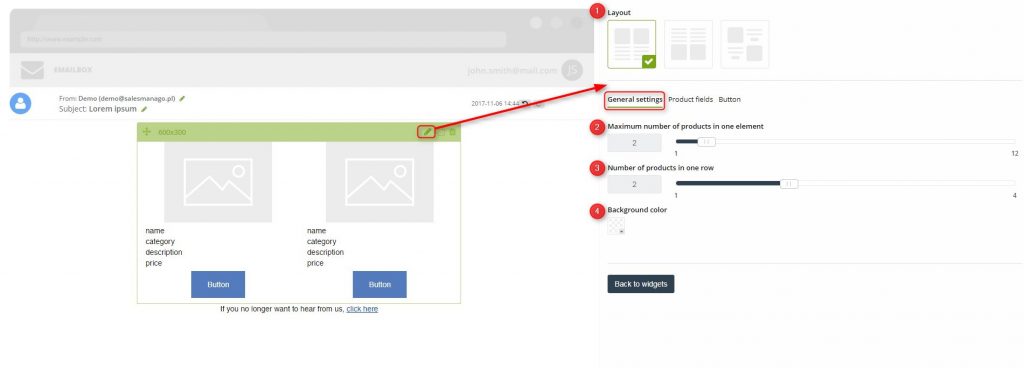
2. Product frame widget
The product frame is a necessary element of the email with the product recommendations. The content of such product frame can include items that were recently viewed by a user. Each field in the widget contains a code, which loads product data from the XML file (by standards the file contains information about name, category, price, and description) of your shop and into the message.
- General settings
In the general settings you can adjust the layout (1) – you can choose one of three available layouts in which the product will display in the frame, maximum number of products in one element (2), number of products in one row (3), and the background color (4).
- Product fields
In this tab you can choose the information about the product that you want to display. By default, it is name, description, category, and price. If the XML file includes non-standard information about the product (e.g. discounted price) you can add them by clicking + on the chosen information. In the effect, this piece of information will appear in the text field.
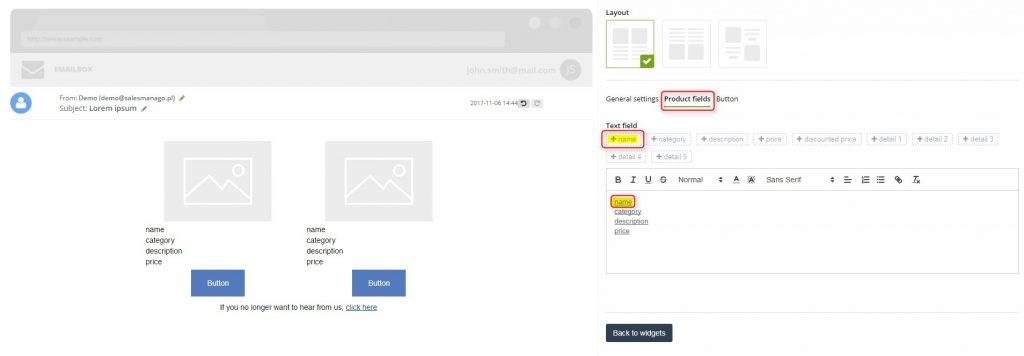
In the text field you can freely edit the font, change its color and type, its size, you can change alignment, add bullets, etc. Additionally, you can include editable text which you can add before or after the units of information about the product.
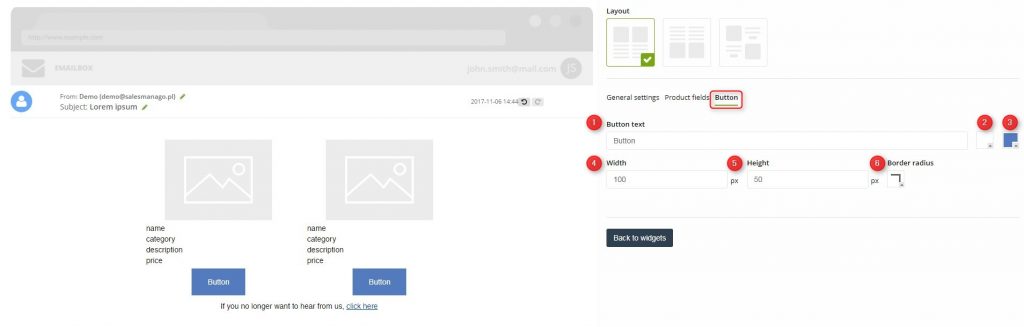
- Button
In this tab, you can customize the appearance of the button. You can adjust the text button (1) – type in the text you want to display on the button that redirects the user to the website of the product, the font color (2) of the button, the background color (3) of the button, width (4) and height (5) as well as border radius (6).
3. Choose a scenario
After creating an email, the next step is choosing a scenario. To do that, you need to choose an email scenario (1) from 7 scenarios available including the one of your own creation (it lets choosing scenario individually for each product field), then, choose a product scenario (2). Scenarios are picked automatically to the number of products in the email (e.g. if a scenario consists of 5 products, the same amount will be displayed). And the last stage is to complete email with the products (3). In case of an insufficient number of products (e.g. not enough products in the XML file or an insufficient number of recommendations for a particular contact), you can choose a mechanism that will put other products in place. You can choose which type of products will complete the email. By default, these are recently viewed products and recommendations not older than 14 days.

Scenarios available
You can choose a ready scenario which facilitates convenient and easy dynamic email creation. You can either edit it or create your own scenario from scratch.
Products from an abandoned cart and similar – in this scenario you have three possible ways to combine products:
- products left in the cart
- products bought with the product added to a cart (the products which have been bought by other users when they purchased the product added to cart)
- products added to cart with a product added to cart (the products which have been also added to cart together with the main product added to cart)
Products from an abandoned cart and viewed during a visit – in this scenario you have two possible ways to combine products:
- products left in the cart
- recently viewed products
Recently viewed and similar products – in this scenario you have two possible ways to combine products:
- recently viewed products
- products from the same category as recently viewed product
Recently viewed products and products viewed together – in this scenario you have two possible ways to combine products:
- recently viewed products
- products viewed with a recently viewed product (the products which have been viewed by other users together with the recently viewed products)
WinBack – products bought together and matched with the purchased product – in this scenario you have four possible ways to combine products:
- products bought with the purchased product (the products which other users bought together with the purchased product)
- products added to a cart with the purchased product (the products which other users added to a cart when they bought the product)
- products viewed with the purchased product (the products which other users viewed when they bought the product)
- products bought with the recently viewed product (the products which other users bought while they were viewing the product)
Own – in this scenario you can freely choose the product scenario
- products left in the cart
- recently viewed products
- products from the same category as recently viewed product
- products from the same brand as recently viewed product
- products from the same category and brand as recently viewed product
- products bought with recently viewed product
- products added to a cart with a recently viewed product
- products viewed with a recently viewed product
- products bought with the product added to a cart
- products added to a cart with a product added to a cart
- products viewed with a product added to a cart
- products bought with the purchased product
- products added to a cart with the purchased product
- products viewed with the purchased product
4. Adjust the settings of the mailing
The last step is to adjust the settings of the mailing.

Name (1) – type in the name of the email under which you will be able to find in the system. If you want to change the subject and the email account, tick the checkbox. Change subject and email account. You will be able to see additional fields.
Subject (2) – it will be displayed as the subject of the email. While you type it in, you can see the progress of changes on the right-hand side of the screen in the preview. You can add simple icons as well.
Email account (3) – from the dropdown list you can choose the email address from which the email will be sent. By clicking [+] button, you can add quickly a new email account.
Shop (4) – from the dropdown list choose the shop from which the products will be dragged to the email.
Send delay (5) – you can send an email after one out of three events (after an abandoned cart, after a visit, after a purchase)
Send X hours after (an abandoned cart, visit, purchase) (6)– use the slider to choose exactly when the email will be send
Google analytics campaign (7) – when creating the final email you can still modify campaign parameter, which will be added to the link as one oh the UTM parameters.
Email test (8) – in order to check how the email displays, you can send a test. Type in the email address to which such email test will be sent.
Preview (9) – after you insert the email address, you will be able to check how the products are presented in the email.
Generate HTML (10) – after you insert the email address, you will be able to generate HTML and you will be able to edit the email if needed.
Send the test (11)– click to send the test email.
You can preview the email and see how it will look like on the desktop, tablet or smartphone (12).
There is a possibility of saving the template as a draft, so you can activate the email later or you can proceed to the sending the email straightforward.
 Follow


![[New Feature] Shine the light on your hidden visitors with Spotlight](https://blog.salesmanago.com/wp-content/uploads/2024/04/1-9.png)

![[New Feature] Unlock Deep Behavioral Personalization with Product Collections](https://blog.salesmanago.com/wp-content/uploads/2024/03/1-3.png)


![[New Feature] Shine the light on your hidden visitors with Spotlight](https://blog.salesmanago.com/wp-content/uploads/wordpress-popular-posts/11939-featured-113x0.png "[New Feature] Shine the light on your hidden visitors with Spotlight")


![[New Feature] Shine the light on your hidden visitors with Spotlight](https://blog.salesmanago.com/wp-content/uploads/2024/04/1-9-1024x536.png)